
Learn to homebrew
Note from Dan - this post was one of the first that I wrote when I started this blog last year. I have further refined my setup and process since then and will be updating this post soon to reflect those changes.
Before getting started, I recommend reviewing the Brew Day Equipment page to learn about the gear you’ll be using brew day.
What’s covered below are the basic steps for brewing beer. Experienced homebrewers might notice some important omissions, for example, adjusting water chemistry, taking water pH readings, recording original and final gravity, and adding kettle finings. I will cover these techniques in the Articles section at a later time. These more ‘advanced’ techniques are very useful but without understanding the basic techniques of making beer, they won’t do you much good. I’d also argue that if your drinking water tastes fine, then it will be fine to use when making beer at home without adjusting its chemistry….for now.
Some of the exact times and temperatures listed below will vary depending on what beer you’re brewing. The times and temps you see below are for making my house ESB (Extra Special Bitter) - an entirely crushable ale that’s known for its near perfect interplay between malty sweetness and hoppy bitterness with a typically low, almost ‘session’ level ABV. Some other styles of beer may require longer or shorter boil times, a higher or lower mashing temperature and certainly a different hopping schedule. Don’t worry too much about that now. Every beer recipe will detail all of those times and temperatures - focus on the process itself when reading the steps below.
One last thing - because we are dealing with yeast, fermentation and room temperatures, do not underestimate the importance of working in a clean workspace with clean equipment. There will be sanitation involved but it’s nothing to be feared. Think of it as part of the process - your beer will thank you. Now let’s get brewing….

Fill up a pot with about 13 cups (0.8 gallons) of water. You’ll want to be able to record the water's temperature. I use a high temperature candy thermometer but you can also use a probe or an instant-read thermometer.
Heat up the water until it reaches a temperature of 170 degrees F. This will become your strike water. Shut off the heat once you reach 170. If you have an electric range like I do you’ll also want to move the pot to a different burner as the burner may continue to produce heat long after it you shut it off.

Next we’re going to add our milled grain to the strike water. Depending on your recipe you’ll need approximately 2lbs for every gallon of water. I’ve posted the full recipe for this ESB on the Recipes page so you can see what’s in my Grain Bill and everything else that needed to make this beer.
I typically order my grains, yeast and hops from my local homebrew store a day or two before brew day. Their online ordering portal allows me to buy exactly what I need, by the pound or ounce. They will even mill (grind) the grains to-order at no charge. You can be like the ‘pros’ and buy whole grains in bulk and a mill them yourself - we’ll get there.
For this ESB I’m using a mix of mostly Maris Otter (a classic English pale malt) and a little Caramel Malt for color.

Slowly pour all of your milled grain into the strike water and stir. Observe the temperature on your thermometer - it should drop down to about 155 degrees or so. This begins the next process - Mashing.

Cover the pot with a lid - you’re going to want to keep the temperature around 155 for the next 60 minutes. You can let it drop 5-7 degrees and that won’t make too much of a difference but you don’t want it above 155 for now. Everyone’s stove is different - I’ve got one very low burner that I can set the pot on and it will do a good job of keeping the mash at a steady temp. If you need to increase the heat do so gradually as you don’t want the grains to scorch. Also, if the temperature goes too high above 155 your mashing process won’t be effective. If it does, you can always add a little cold water to quickly bring the temp back down.
You’ll also want to periodically stir your mash, 10-15 minutes. These are good times to check your mash’s temperature.
So what’s going on here? During mashing, we use heat and water to extract as much fermentable sugar from the grain as possible. There’s a lot of science that goes on behind the scenes - I won’t get into that here but I will say that the 145-155 degree F range is pretty standard for most Single Infusion Mashes (that’s what we’re doing here). Too low of a temp and you won’t extract enough sugar. Too high and you’ll basically kill the process.

With about 10-15 minutes left on your 60 minute mash, fill up a second pot with a gallon of water and heat it to 170 degrees F.
Once you’ve hit the 60 minute mark, turn up the heat on your mash until it reaches 170 degrees F. This is called Mashout. After 60 minutes, you’ve extracted all of the possible sugar from the grain so it’s alright to go above the 155 degree mark. We heat up both the mash and the second pot of water to ‘loosen up’ the mash and prepare it for the next step - Lautering.

Lautering is fancy way of saying that we will separate the grains from the sweet liquid that we have created during mashing. This liquid is called Wort.
I like using this setup here: a 10” heavy duty strainer set on top of a clear 12 quart Cambro container with easy to read markings on the side. While not true lautering in the way that a commercial brewery will do it, the end result is pretty similar.
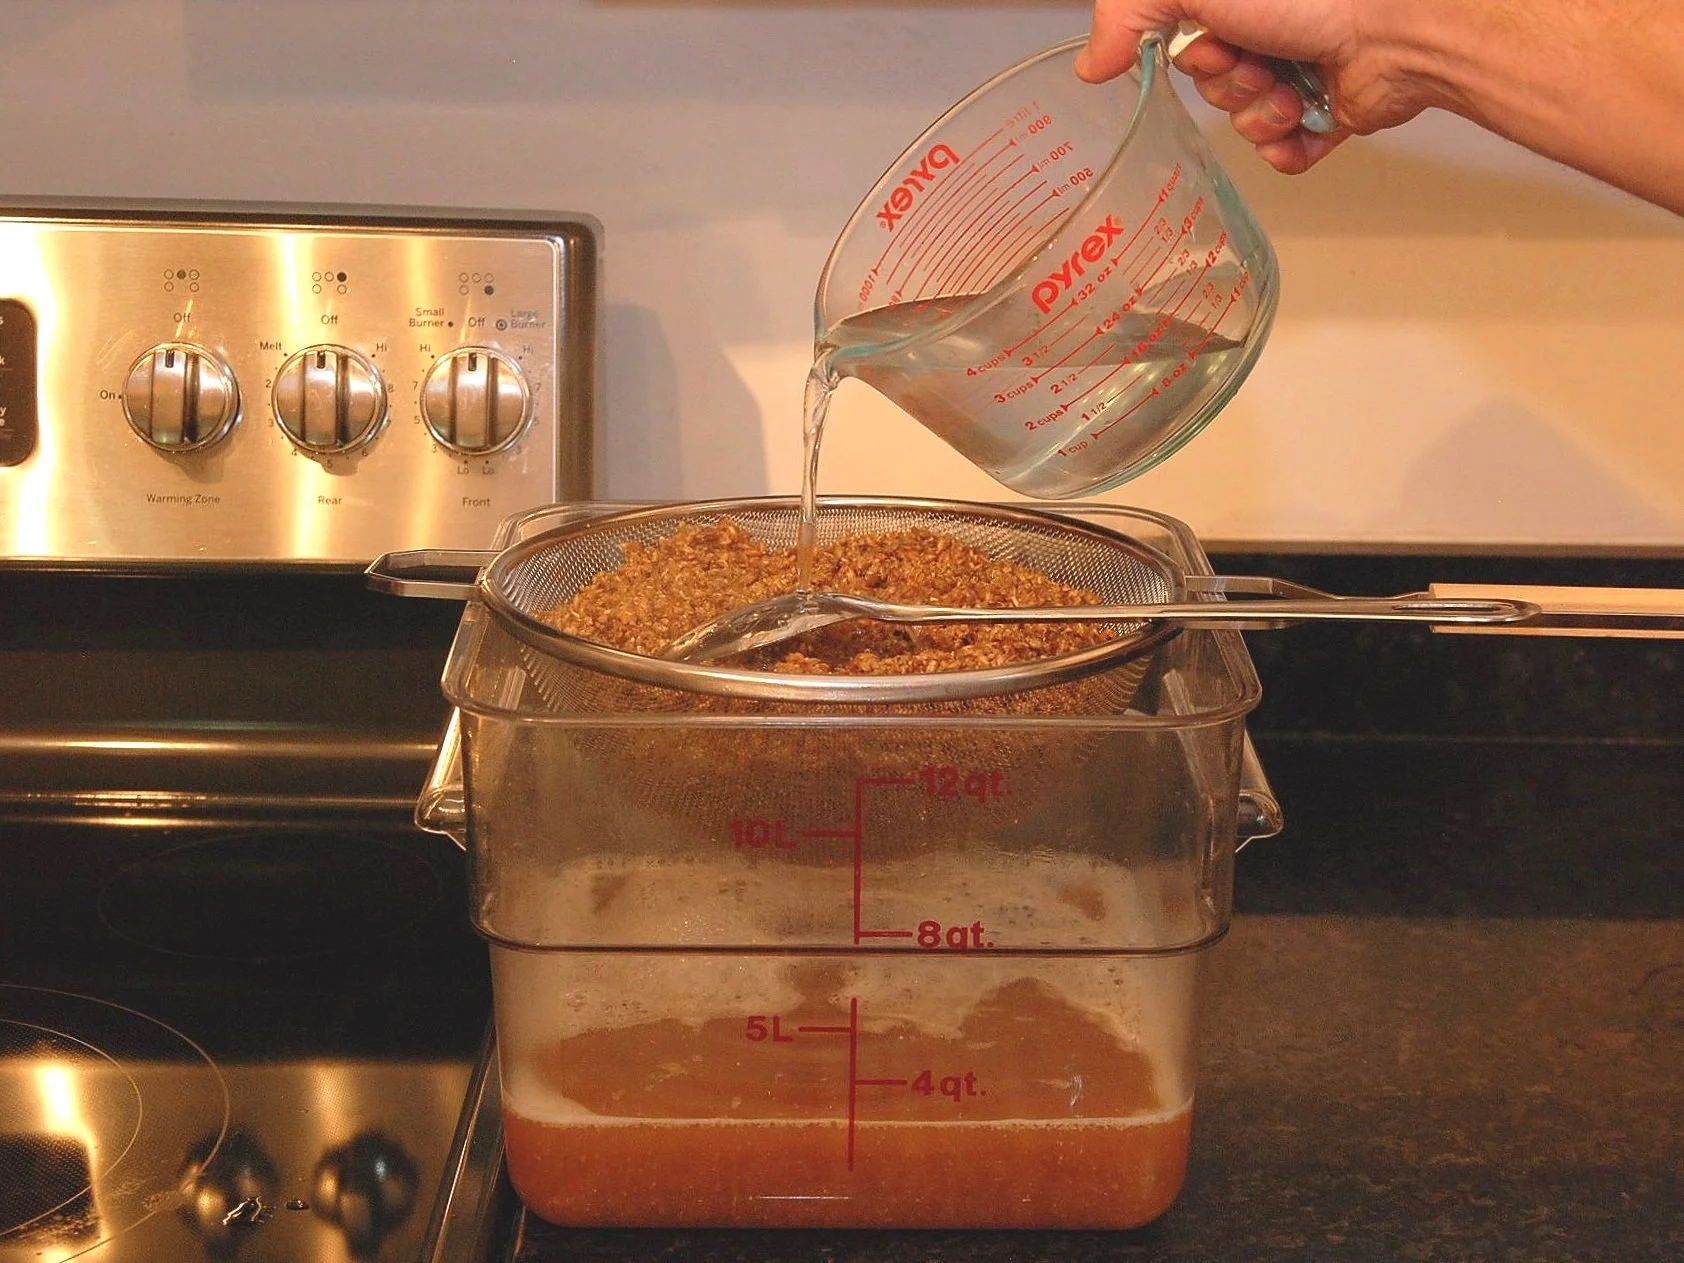
The next step will be Sparging. This is where you will take the hot water from the second pot and slowly pour it through the strained grains to rinse any remaining sugar off of the grain for collection into the wort below. Conventional wisdom suggests to go slowly here - I take a measuring cup, dunk it into the pot with the hot water and then pour that hot water through a slotted spoon over the grains, moving the spoon and cup around as I go. The slower this water drips through the grain, the less chance you have of extracting tannins from the grain, which could lend an unpleasant bitterness to your final product
This is where having a clear container comes in handy as we want to collect about 5 quarts of wort. You may not need to use the full gallon of water that is in your second pot to reach that goal. The total amount of wort you collect here might be influenced by the type of beer you’re making as well as the length of time called for in the next step - the Boil.
P.S. now would be a good time to wash out the Cambro since we’re going to need it again later.

Rinse out the pot that you used for mashing and return the 5 quarts of wort that you’ve collect to it. Bring the wort up to a boil.

It will take a few minutes for your wort to come to a boil.
Some recipes, like this one, call for hop additions the moment the wort starts boiling. When the recipe calls for that and you have a 60 minute boil time, we call that a ‘60 minute hop addition’. Use the time waiting for the wort to boil to measure out this hop addition - in this case, 9 grams of East Kent Goldings.
If using a hop spider (or muslin bag), go ahead and get that ready too.
Note: Now would also be a good time to remove the yeast that you’re going to use from the refrigerator to allow it to gradually come up to room temperature prior to Pitching (adding it to your wort).

Your wort will take somewhere around 10 minutes to come to a boil (at least that’s how long it takes on my stove). When you get to the point where you can see the wort break through the layer of foam on the surface, you need to watch it like a hawk as this will want to boil-over almost immediately after it starts boiling. Be prepared to act quickly by lowering the heat or even temporarily moving the pot off of the heat. Boil-overs are messy to clean up and a waste of perfectly good wort.
The good news is that once you reach a boil and you dial in the appropriate heat setting you can relax. The goal here is to sustain a rolling, but not too vigorous boil for full duration of your boil time - in this recipe, it’s 60 minutes, which is a pretty standard boil time.
So what’s happening here…why do we boil? Boiling serves to sterilize your wort - important in the fight against bacteria. Boiling will also concentrate flavors. The 5 quarts of wort you started with will reduce to 4 quarts by the time the boil is done. Concentrating wort will also allow you to dial in your original gravity (OG), which we will cover at a later time. The combination of adding hops to boiling wort also helps extract the bitterness and flavors that they provide.

Once your wort has started boiling, set a timer for 60 minutes (or for however long your recipe calls for).
For this recipe, I also added the 9g of East Kent Goldings hops to my hop spider and set that in the pot.
A hop spider is essentially a large metal tea bag. When you brew tea at home, it’s better to have a way to remove the tea leaves from your tea once you’ve extracted their flavor and color, rather than have to drink around all of loose leaves floating in your tea. Same idea with a hop sider - we will ultimately stain this beer but I’d rather keep all of those hop particles out of the wort to begin with.
Use the time while your wort is boiling to get ready for the next steps.
Once the wort has boiled, it is considered to be sterile. You will want to do everything you can to keep it that way as the introduction of bacteria could be catastrophic for your wort. The way we do that is by becoming friends with sanitation.
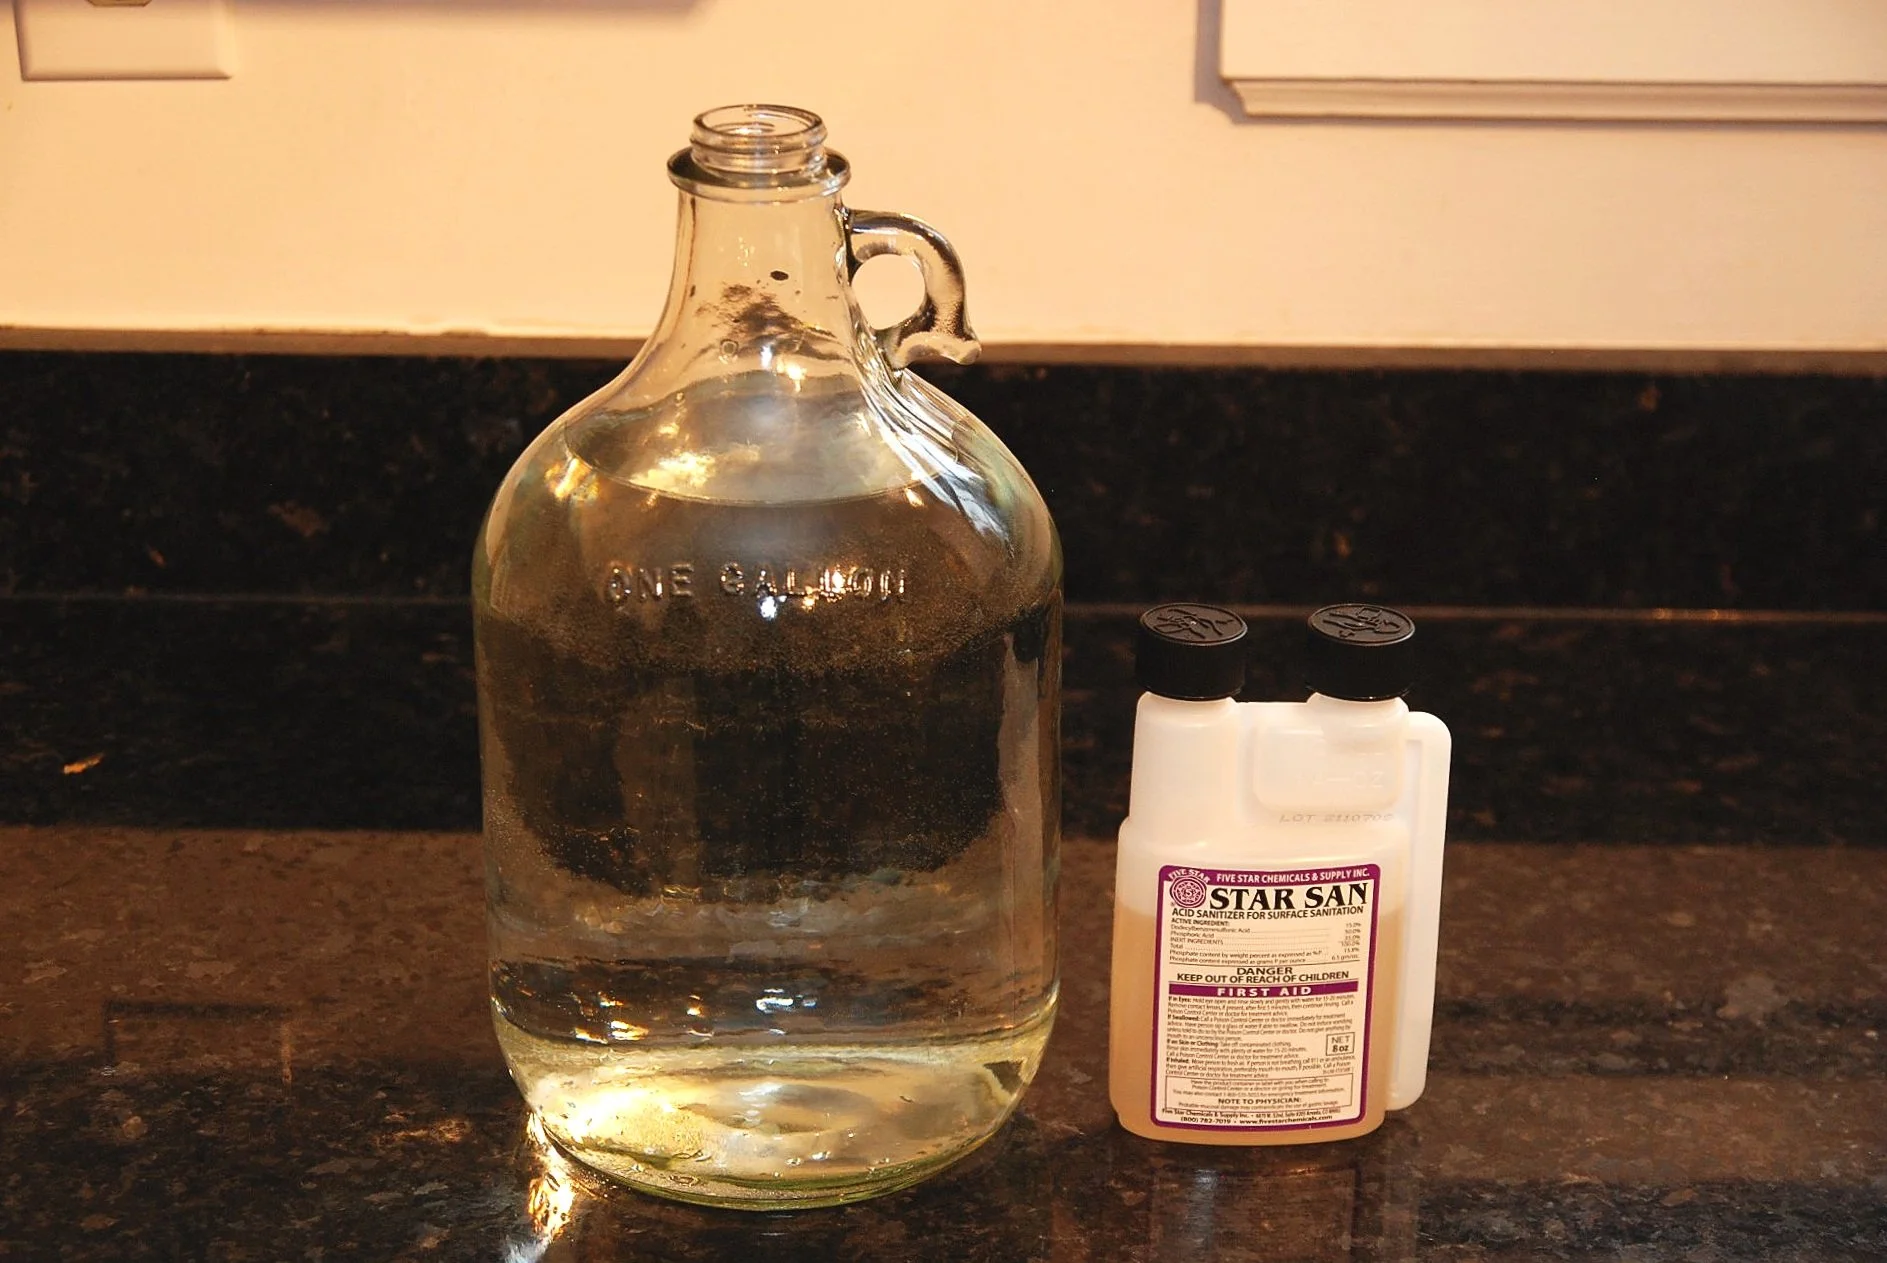
Fill your glass carboy with a gallon of water. I measured out exactly a gallon here and can’t figure out why no carboy seems to have a gallon-fill-line.
Star San is a concentrated, acid based, high-foaming, no-rinse, flavorless, colorless, food-safe sanitizer that is widely used by homebrewers. It needs about a minute of contact time to render sanitized whatever surface it comes in contract with. Standard dilution is 1 oz of Star San for every five gallons of water. We can scale that down to 0.2 oz per every gallon of water. You’ll notice the Star San container has two caps - the one on the left is for pouring large amounts while the one on the right allows you to squeeze the bottle to dispense a much smaller amount. It has a mark for 0.25 oz - I usually squeeze enough Star San so it measures right below that line. Once measured, pour it into the carboy filled with water, put the palm of your hand over the carboy’s opening and shake it a few times to mix it.

Once you’ve got your sanitizing solution mixed, pour it out into your clean 12 qt Cambro. Once the carboy is emptied out, leave it submerged, open-end facing down into the solution, for a minute. Take it out of the solution and set it aside, right side up. Take a wad of paper towel, submerge it in the solution and then push it into the carboy to seal off the opening. Set it aside for now.
The first time you see all of the bubbles in the carboy, you may think to yourself, this isn’t right…. I’m supposed to pour my wort in here? That is exactly what you’re supposed to do - see all of the points above about Star San being a high-foaming, no rinse solution.
At this point we need to sanitize anything that is going to come in contact with the wort. As rh is sterilized, so must everything else be that touches it.
In the Camrbo I have placed the carboy’s screw-top lid, the funnel and screen, a 3’ length of clear 5/16” outer-diameter tubing, the same (clean) metal slotted spoon I used earlier and the probe end of my thermometer.
You’ll also notice the spray bottle in the background. I have saved some extra sanitizing solution from the last batch I made and poured it into this bottle, which I will use to spray on counter surfaces, my hands after I wash them and on a few other times. It’s very handy to have this. I wouldn’t keep a batch of pre-made solution on hand for more than a week or so - as I am brewing pretty regularly, I just change it after every brew day.
Note: between the Cambro and the carboy is a 16oz plastic container with a lid. I’ve filled that with some sanitizing solution and submerged the three piece airlock. We won’t need this today but we will in a few days. Might as well prepare that now and set it aside.

After boiling, we need to cool down the wort. General best practice is to cool it down as quickly as possible. An ice bath in a clean sink is usually the fastest way to cool it down without investing in any special equipment. My freezer never quite makes enough ice for this so I use lots of freezer packs or blocks. A quick cooling down period lessens the chance of bacteria growth - they’d love to make a nice, cozy home out of all that warm, sugary wort you’ve gone through the trouble of making
You can help the cooling process along by stirring the wort occasionally. Remember, once you use the spoon, rinse it off and put it back in the sanitizing solution and keep it in there until you need it again. Same goes for the probe thermometer since that’s what you’ll use to check the temperature of the cooling wort.
The type of beer you are making will determine the temperature you cool the wort to. Whatever yeast you are using will also give you a temperature range for which it will be most effective. If your wort is too hot, you will kill your yeast so proper wort cooling is very important. This recipe calls for a 70 degree yeast pitching temperature. My ice bath setup usually needs about a 30-40 of cooling time to get there.
Note: You no longer need the hop spider and its contents at this point. Raise it out of the wort, let any remaining liquid drain back into the wort and the set the hop spider aside for cleaning later. See all of that sediment left in there? Better kept in the hop spider than in your wort.

When your wort has cooled to the proper temperature - 70 degrees for this ESB, you are ready to transfer from the pot to the carboy.
Wash your hands and spray them with sanitizing solution.
I like to keep the pot covered while I’m getting set up. I put the pot’s lid into the sanitizing solution before I used it to cover the pot. I also make sure that every surface of the funnel has been soaked in solution and that the funnel screen is properly installed before using it.
Remove the paper towel from the carboy and set it in the sink. Use the spray bottle to spray solution all around the carboy’s opening before putting the funnel in.
Also note that I’m using another 16oz container filled with sanitizing solution. This one has the yeast packet submerged in it (the end needs to be cut to open it) as well as the scissors that will be used to open it. Most packages of yeast require some agitation to evenly disburse the yeast in the slurry contained in the package - do this before you put it into the sanitizing solution.

Slowly pour the wort through the funnel into the carboy.
If you have a lot of small particulate matter in your wort you might need to use the spoon to agitate if the filter in funnel gets blocked. Make sure that spoon is sanitized before doing so.

Once all of the wort has been poured into the funnel, it’s time to pitch your yeast. Spray your hands with sanitizing solution and while you’re at it, spray around the opening of the carboy too. Using the scissors, cut open the package of yeast and empty its contents into the carboy.
Screw the plastic cap onto carboy. This step is a little awkward but very necessary - you need to vigorously shake the carboy for 30-60 seconds. I find the best way to do this is to use my right thumb to close off the opening. I then grip my index and middle finger over then through the handle. Pick up the carboy with your right hand and then grab the bottom with your left hand. Rotate the carboy 90 degrees so that you’re holding it lengthwise and shake it side-to-side. Every few shakes, lift up your thumb gently to release the vacuum that you’ve created inside.
All of this shaking is needed to fully disperse the yeast throughout the wort as well as to aerate the wort, which will aid in the fermentation process.
Nevermind that the wort looks a little like a lava lamp at this point - it will all sort itself out, I promise.

After shaking, once again, spray the carboy’s cap with sanitizing solution. Then take your sanitized tubing and thread one end of it through the opening in the carboy’s cap. It only needs to go about 2-3” through. Take the rest of your sanitizing solution and pour it into a clean pot, then take the second end of the tubing and place it into the pot, making sure to fully submerge it in the solution.
You have now successfully set up your wort for fermentation. The yeast will feast on all of the sugar in the wort, converting it into alcohol and carbon dioxide. The alcohol will stay in the wort but the CO2 needs a place to go, hence the tubing - also known as a blow off tube. The CO2 exits the carboy via tube and disperses into the sanitation solution. The solution prevents additional air / oxygen from entering your wort. From now on, you’ll want to avoid exposing your wort to oxygen as much as you possibly can as it will cause off-flavors and colors in your final product. You’ll also be able to hear the CO2 bubbles escaping into the solution - that way you can hear the fermentation in all of it’s glory.
Park this whole setup - the carboy, blow-off tube and pot - someplace dark (light is also going to cause problems for your finished product) with a pretty consistent temperature of 65-70 degrees F for the next two weeks. I’ve got a small utility closet with a door right off my kitchen that makes for a perfect fermentation chamber for beers like this.
Check on your fermentation after 24 hours. It should look and sound something like this:
Within the next 24 hours the bubbling should be even more frequent.
By the third day, the bubbling should start to subside or maybe even stop. That’s normal, that means that yeast have done the bulk of their work. It’s still not done working and will need more time but there’s one more thing we have to do here before we can bottle or keg.

When the bubbling has stopped or subsided, replace the blow-off tube with a three-piece airlock. This essentially serves the same purpose as the blow-off tube as it will keep oxygen out of your finished product and will allow the venting-off of CO2 gas. It just can’t handle the same volume of CO2 as the tubing which is why we wait until the bulk of the fermentation process has finished before we deploy it.
To set up your airlock simply fill the piece on the left up to the line with sanitizing solution, drop in the middle piece, then cover with the cap.

Remove the blow-off tubing, give the carboy’s cap and the end of the airlock that will go through the cap a few sprays from your sanitizing bottle, then insert the airlock into the hole in the cap. Park this back into your fermentation chamber for 11 days. At that point your beer will have been in the carboy for two weeks and you will be ready to keg or bottle it.
Make sure to clean your blow-off tube really well as there is going to be all kinds of gunk from fermentation stuck in there. Soaking in some water before flushing the tubing with hot water usually works pretty well.
Notice how much the beer has already cleared up after three days in the carboy. It will continue to clear up as it conditions in the keg or bottle.